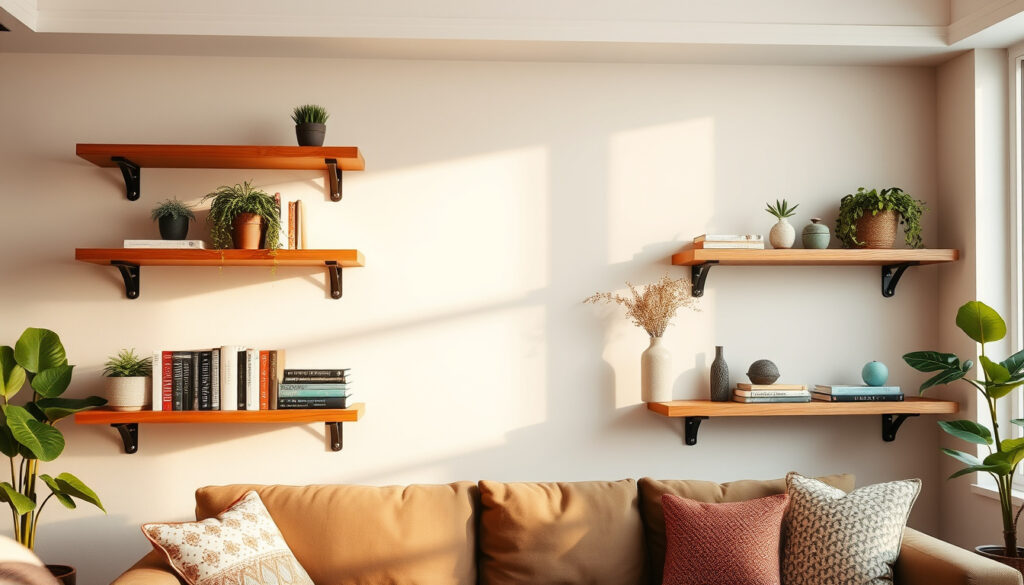
How to Hang Shelves: Beginner Guide, No Drill, Brackets
Hanging shelves for the first time feels like a bigger deal than it needs to be — half the battle is just figuring out whether you even own a drill. This guide walks you through everything from stud-finding to Command strips, with weight limits and beginner mistakes spelled out plainly.
Preferred wall anchor: Studs · No-drill option: Command strips · Bracket method: Drill into track · Common error count: 4 per CMA
Quick snapshot
- Studs are the strongest anchor available — hands down (Park Lane Jewelry)
- Adhesive shelves safely hold only a few pounds without wall damage (Woodsnap)
- Specific weight capacities from Command strip manufacturers without product specs
- Long-term durability of adhesive methods over years of use
- No-drill shelving surged as a renter solution through the 2020s (Woodsnap)
- Choose your method based on wall type, weight load, and whether you need a renter-friendly removal option
Three methods for hanging shelves have settled into common practice, each with distinct trade-offs around strength, wall impact, and tool requirements.
| Label | Value |
|---|---|
| Stud securing | Hands down best per Park Lane Jewelry |
| Tape trick | Full strip for alignment per DIY Tutorial Video |
| Non-permanent | Command strips or tension per Woodsnap |
How do you hang shelves for beginners?
If you’ve never hung a shelf before, the good news is that the basics are genuinely simple — and the bad news is that most beginners make the same four mistakes without realizing it. Before you mark anything on the wall, figure out whether your wall is drywall, plaster, or concrete, because that single factor determines everything about your method.
Tools needed
- Measuring tape
- Pencil
- Level (laser or bubble)
- Stud finder (for drilling method)
- Drill with appropriate bits (for drilling method)
Basic steps
- Decide on shelf height and mark with pencil
- Run painter’s tape along the wall to protect the surface
- Position your hardware and trace bracket holes
- Check alignment with a level before committing
- Install anchors or adhesive brackets, then mount the shelf
Beginners who skip the level check end up with crooked shelves they notice every single day — a 30-second step saves years of regret.
How can I hang shelves without drilling holes?
No-drill methods have become the go-to solution for renters and anyone unwilling to patch walls later. Adhesive strips work for small, lightweight shelves, while reinforced hooks or brackets handle medium loads. You need no power tools, and removal leaves walls unmarked if done correctly.
Command strips method
- Clean the wall surface with alcohol or a degreaser
- Apply strips to the back of your bracket or shelf
- Press firmly for at least 30 seconds (some users hold for 60 seconds for a more secure bond)
- Remove the backing and press the shelf against the wall
- Test by gently pulling downward before loading
Tension rods
- Tension pole shelving uses floor-to-ceiling pressure without wall contact, making it ideal for closets or spaces where adhesives won’t grip
- Adjust the pole length until it’s snug between floor and ceiling
- Add shelf boards across the tension rods
Command strips perform best on smooth painted drywall and should be avoided on textured or wallpapered walls — the adhesive simply cannot bond properly on uneven surfaces.
Non-permanent brackets use tension or clamps for medium to heavy items, but they require precise floor-to-ceiling measurement and won’t work in rooms with cathedral ceilings where no-contact shelving is impossible.
How to attach shelves to a wall?
The method you choose depends on how much weight the shelf will carry and whether you can drill into studs. Floating shelves typically use brackets or cleats hidden behind the shelf face, while traditional shelving requires visible supports.
With brackets
- Locate studs with a stud finder — aim for at least two studs per shelf
- Mark bracket positions using a level and pencil lines
- Pre-drill pilot holes, insert wall plugs if needed, then secure brackets with screws
- Slide the shelf onto the brackets and check stability
Floating shelves
- A recessed wooden cleat provides a robust bracket-free option for floating shelves
- Mount the cleat horizontally into wall studs or use heavy-duty anchors
- Slide the shelf over the cleat until it seats fully
- Check that the shelf sits flush against the wall with no wobble
Keep weight under 15 pounds per shelf unless your floating shelf is secured into wall studs — the screw-in anchors designed for drywall have a practical limit that inexperienced installers sometimes ignore.
Is it better to hang a shelf with nails or screws?
The answer depends on wall type, weight load, and whether you might need to remove the shelf later. Screws outperform nails in nearly every realistic scenario for shelf mounting.
Nails drive faster but grip through friction alone, which loosens over time as the wood and wall settle. Screws thread into the wall plug and hold through mechanical threading, making them far more resistant to gradual loosening. For drywall, screws paired with wall plugs distribute weight across a wider surface area than nails, which can pull through drywall under heavy loads.
Two practical alternatives for drywall without drilling primary holes include toggle bolts and molly bolts, both of which expand behind the wall to grip more surface area.
Nails pros and cons
- Quick installation — hammer and nail is faster than drilling
- Suitable for very light loads (under 5 pounds)
- Tends to loosen over months of use
- Cannot be repositioned without leaving visible holes
Screws advantages
- Holds firm through mechanical threading into wall plugs
- Handles medium to heavy loads with proper anchors
- Easy to remove and reposition with minimal wall damage
- Better for plaster and concrete where nail grip is poor
The implication: screws cost a few extra minutes and are worth every second when your shelf holds anything heavier than a postcard.
What are common mistakes when installing shelves?
Four mistakes per CMA (a common measurement approach in DIY guides) appear regularly across beginners and experienced installers alike. Most are avoidable with basic checks that take under a minute each.
Floating shelf errors
- Not checking wall straightness before mounting — walls are rarely perfectly plumb
- Overloading shelves beyond the adhesive or anchor rating
- Skipping the adhesion preparation: surfaces must be clean, dry, and free from dust or grease
- Installing at awkward heights for aesthetic balance rather than usability
Corner shelf pitfalls
- Failing to account for corner trim or molding that affects bracket positioning
- Mounting too close to ceiling corners where access for leveling is constrained
- Not using enough brackets for wide corner shelves, causing sagging over time
Two approaches dominate the comparison: traditional nail or screw installation versus adhesive-based systems. Each has distinct weight limits and wall requirements.
| Method | Best for | Weight capacity | Wall impact |
|---|---|---|---|
| Nails | Very light decorative shelves | Under 5 pounds | Small holes, patchable |
| Screws into studs | Heavy loads, long-term installation | 50+ pounds per stud | Holes require patching |
| Command strips | Renters, temporary, lightweight | A few pounds per strip | None |
| Tension poles | Closets, no-wall-contact setups | Medium loads | None |
The pattern here is clear: permanent mounting trades wall integrity for load capacity, while renter-friendly options sacrifice strength for removability.
Upsides
- Studs provide the strongest permanent anchor
- Adhesive methods are renter-friendly and wall-safe
- Tension poles avoid wall contact entirely
- Partition brackets use strong adhesive backing without nails
- Test hanging systems with weight before loading shelf
Downsides
- Adhesive shelves safely hold only a few pounds
- Command strips fail on textured or wallpapered walls
- Specific Command strip weight capacities not publicly listed by manufacturer
- Toggle and molly bolts require drilling for insertion
“I invented a better way to mount a shelf using stick-on shelf brackets,” said a DIY creator demonstrating the adhesive bracket method on YouTube.
— YouTube Tutorial For those seeking professional help, finding an eye doctor near me Ireland can be a good option.
“Adhesive strips are a quick and easy way to hang small shelves, while hooks and brackets are better suited for heavier shelves,” according to Park Lane Jewelry’s guide on no-drill mounting.
“You can add shelves to your space without making holes in the wall,” writes Woodsnap, noting that tension pole systems use floor-to-ceiling pressure entirely independent of wall attachment.
— Woodsnap
“No Drilling Installation – Designed with strong adhesive backing, this partition bracket installs easily without nails or screws, protecting walls,” according to the Walmart product description.
Renters who choose Command strips or tension poles can install and remove shelves without ever touching the wall, while homeowners planning long-term shelving get screws into studs that deliver hold adhesive simply cannot match.
Related reading: Video Wall Installation Guide · How to Make Matcha Latte
Mastering secure wall attachments first through this step-by-step picture hanging guide will make hanging even heavy shelves far easier for beginners.
Frequently asked questions
What is the rule of three for shelves?
The rule of three suggests arranging shelves in odd numbers — typically three — because odd groupings create more visual interest and balanced composition than even numbers. On a practical level, three shelves allow for vertical spacing that accommodates most common items while maintaining a clean, gallery-like appearance.
Will Command strips hold a shelf?
Yes, Command strips can hold lightweight shelves, but with a strict weight limit. Adhesive shelves using Command strips safely hold only a few pounds. For anything beyond decorative items, use reinforced adhesive brackets or traditional mounting into studs.
How to hang shelves without a level?
You can use a tape measure to measure the distance from floor to underside of the shelf at multiple points, keeping measurements equal for straight alignment. Alternatively, download a smartphone leveling app that uses the device’s accelerometer — most smartphones have built-in sensors accurate enough for basic shelf installation.
How to put up a shelf at B&Q?
B&Q, like most home improvement retailers, sells shelving kits that include brackets, screws, wall plugs, and instructions. The general process involves marking bracket positions, drilling pilot holes, inserting wall plugs, securing brackets with screws, and placing the shelf board on top. B&Q’s in-store staff can advise on anchor selection for your specific wall type.
What are common mistakes with floating shelves?
Common mistakes include not checking wall straightness, overloading beyond the anchor rating, skipping surface cleaning before adhesive application, and installing at impractical heights. A recessed wooden cleat method tends to be more robust than adhesive-only floating shelf installations.
How to install floating shelves without brackets?
A recessed wooden cleat mounts directly into wall studs and accepts the shelf from above, creating a bracket-free floating appearance. The cleat distributes weight along its full length, allowing floating shelves to support heavier items than adhesive methods. Mark bracket positions precisely using pencil lines for alignment before installing the cleat.
How to hang shelves with metal brackets?
Locate wall studs with a stud finder, mark bracket positions, drill pilot holes, insert wall plugs, and secure brackets with screws. Use a level during marking to ensure brackets align horizontally. Space brackets according to shelf width — wider shelves need additional center support to prevent sagging.
More related posts
 52 Inch to CM – Exact Conversion and TV Guide
 Cold Storage Giant Singapore: Macrovalue Acquisition Details
 Harry Potter and the Philosopher’s Stone vs Sorcerer’s Stone
 What Is MediShield Life – Singapore’s Basic Health Insurance Guide
 Sembawang Traditional Claypot Rice: Unique & Where to Find
 Sheng Siong Supermarket Photos: Singapore Stores & Promotions
 Redmi Watch 5 Active: Full Specs, Features & Review
 Fu Yuan Teochew Dining: Menu, Reviews & Clarke Quay Guide