How to Make Banana Chips at Home: Oven, Air Fryer, Dehydrator
If you’ve ever bought a batch of banana chips only to find them overly sweet, greasy, or stale, you already know the appeal of making them yourself. This guide walks through three ways to turn a few bananas into crispy chips right in your own kitchen.
Oven baking time: 1.5-2 hours ·
Dehydrator temperature: 135°F ·
Air fryer initial cook: 20 minutes at 100°C ·
Dehydrator time for chewy chips: 8 hours ·
Oven flip after: 40 minutes
Quick snapshot
- Oven and dehydrator times verified across multiple recipe sources (The Honour System)
- Air fryer produces crispy chips in 10-12 minutes at 350°F (Super Healthy Kids)
- Lemon juice dip prevents browning during prep (The Honour System)
- Exact crispiness factors vary by banana ripeness — no single formula works for every fruit
- Humidity impact on dehydration outcomes lacks documented guidance
- Batch size scaling recommendations not standardized across sources
- Air fryer banana chip recipes emerged as a popular home cooking trend in the 2020s
- Oil-free air fryer recipes gained traction starting around 2021
- Multi-method guides combining oven, air fryer, and dehydrator appeared from 2022 onward
- Choose your method based on time: air fryer wins for quick crispy chips, dehydrator for chewy texture
- Storage in airtight containers preserves crunch for several days
- Season variations (cinnamon, salt, turmeric) expand the flavor profile beyond plain chips
These parameters represent the key variables across the three preparation methods covered in this guide.
| Parameter | Recommended value |
|---|---|
| Best bananas | Ripe medium-sized |
| Slice thickness | Thin or 4mm |
| Prevent browning | Lemon juice dip |
| Common temps | 135°F dehydrator, 100°C air fryer |
| Air fryer temp (crispy) | 350°F |
| Oven temp | 200°F |
| Dehydrator time | 8 hours |
| Cool time before serving | 3-5 minutes |
What is the process of making banana chips?
The basic workflow comes down to three steps: slice, treat, and dry. You slice the bananas thin enough that moisture escapes during cooking, dip them briefly in lemon juice to prevent browning, then apply heat until they crispen up. The method you choose for that final drying step — oven, air fryer, or dehydrator — determines how long you wait and what texture you get.
Ingredients needed
You need bananas first, obviously, but ripeness matters more than most people realize. Firm, slightly green bananas hold their shape better during cooking and yield a more pronounced chip texture. The rest is simple: lemon juice for the anti-browning dip, and whatever seasonings catch your interest.
- 3-4 medium ripe bananas
- 2 tablespoons lemon juice mixed with ½ cup water
- Optional: cinnamon, salt, or a light oil spritz
Basic slicing and prep
Slice your bananas to about ¼ inch thickness — thinner if you want extra crispy chips, thicker if you prefer something with more chew. A mandoline gives you the most consistent results, but a steady hand with a sharp knife works fine too. The moment you cut them, drop the slices into your lemon water bath. Let them soak for 2-3 minutes, then drain and pat dry before moving to the cooking stage.
Skipping the lemon dip means your chips will turn brown and take on a mushy, oxidized flavor. Ten minutes of prep work now saves you from disappointing results later.
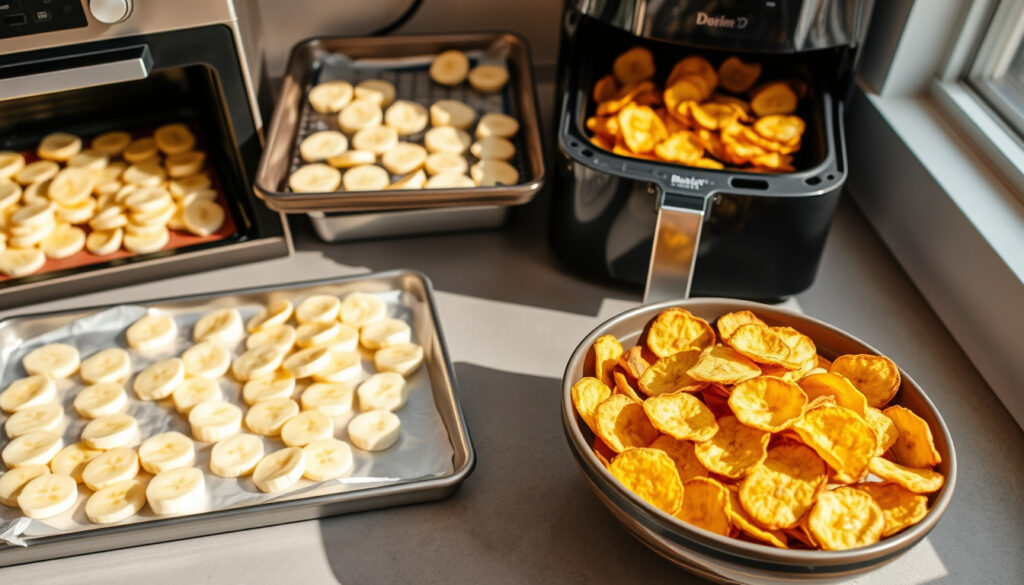
Drying methods overview
Three kitchen appliances handle the drying job: your conventional oven, an air fryer, or a dedicated food dehydrator. Each has trade-offs in time, texture, and convenience. The oven takes longest but needs no special equipment. The air fryer sits in the middle, producing crispy chips in under 15 minutes. The dehydrator wins for chewy textures but requires the most patience — plan for an overnight cycle.
When selecting a method, consider your available time and desired outcome: the air fryer delivers speed, the dehydrator preserves nutrients at low temperatures, and the oven offers maximum accessibility.
How do you make dried banana chips?
Dried banana chips differ from their crispy cousins in one key way: you remove moisture slowly at low temperature, which preserves some pliability rather than driving all water out. The result tastes more like a leathery fruit strip than a chip, but many people prefer this chewy quality, especially for trail snacks.
Using a food dehydrator
Set your dehydrator to 135°F and arrange banana slices in a single layer on the trays, making sure none overlap. Run the dehydrator for approximately 8 hours for a chewy texture, or extend to 10-12 hours if you want them fully dried and crunchy. Check every few hours once you’re past the 6-hour mark — humidity levels in your kitchen and the water content of your specific bananas affect timing more than any recipe can predict.
The dehydrator requires no oil to produce satisfying results. Low and slow is the name of the game here.
— Real Food Real Deals (food drying resource)
Preparation steps
Whether you’re using a dehydrator, oven, or air fryer, the prep work stays the same. Cut your bananas to 4mm thickness — this measurement matters more than any specific technique. Slice too thick and the center stays wet; too thin and they burn before the moisture escapes. Soak in lemon water for 2-3 minutes, drain, and pat completely dry with paper towels. Any surface moisture remaining will steam instead of crisping.
Storage tips
Cool your finished chips completely before storing — trapped warmth creates condensation, and soggy banana chips go stale within hours. Transfer to an airtight container or zip-top bag with as much air removed as possible. Stored this way, your chips stay crispy for 3-5 days at room temperature, or up to two weeks in the refrigerator.
Humidity is the enemy of homemade dried fruit. If you live somewhere humid, consider adding a food-safe silica gel packet to your storage container — it’s a small step that dramatically extends the crisp life of your chips.
For those in dry climates, ambient humidity may work in your favor, but most home cooks find that silica gel packets make a measurable difference in retention quality.
How to make banana chips in the oven
The oven method asks the most patience but requires zero special equipment. If you have a functioning oven and a baking sheet, you can make banana chips right now. The trade-off is time: you’re looking at 1½ to 2 hours of baking, and you’ll need to flip the slices halfway through.
Baking instructions
Preheat your oven to 200°F — this low temperature is essential. Higher heat cooks the outside before the moisture inside has a chance to escape, leaving you with burns and raw centers. Line a baking sheet with parchment paper and arrange your lemon-treated banana slices in a single layer, again making sure none touch. Slide the tray into the oven and set a timer for 40 minutes.
Temperature and timing
At 200°F, expect your banana chips to need 1½ to 2 hours total. The exact time depends on your oven’s accuracy and how thick you sliced the bananas. Check at the 1-hour mark by lifting a chip with a spatula — if it bends without snapping, give it more time. If it cracks slightly but still flexes, you’re close. When it snaps cleanly with a light snap sound, it’s done.
- Temperature: 200°F throughout baking
- Total time: 90-120 minutes
- Flip at: 40-50 minutes
- Doneness test: chip bends without breaking
Flipping technique
At the 40-minute mark, pull the tray out and flip each slice with a thin spatula. This step matters more than most people expect — the side facing down stays damp and pale without rotation. After flipping, return the tray to the oven for the remaining time. Let the finished chips cool on the tray for 5 minutes before handling; they firm up as they cool, just like air-fried versions do.
Conventional ovens run hot spots. If your chips on one side of the tray are browning while the other half still look pale, rotate the tray 180 degrees at the flip stage, not just flip the slices in place.
Older ovens with uneven heating benefit most from this 180-degree rotation, since consistent browning depends on more than just flipping the slices.
How to make banana chips in air fryer
The air fryer dominates the quick-chip category. Where the oven needs 2 hours and the dehydrator needs 8, your air fryer delivers crispy banana chips in 10-12 minutes. The circulating hot air mimics deep frying without the oil, and the results genuinely surprised many home cooks who assumed you needed a fryer to get that crunch.
Air fryer settings
Set your air fryer to 350°F for the standard approach. Arrange banana slices in a single layer in the basket — overcrowding is the most common mistake and guarantees uneven results. Some cooks prefer to work in batches even if it means doing multiple short sessions rather than cramming everything in at once.
You can make air fryer banana chips without oil, and they’ll still turn out crispy. A light spritz of oil helps them brown more evenly and prevents sticking, but it’s optional.
— Also the Crumbs Please (recipe developer)
Single layer arrangement
The single-layer rule isn’t about crowding — it’s about airflow. Hot air needs to reach all surfaces of every slice. If slices overlap, the ones underneath stay damp and never crisp up. Work with whatever your air fryer basket can hold in a single uncrowded layer, and cook in batches if needed. Most standard air fryer baskets accommodate 2-3 medium bananas worth of slices per batch.
Cooking duration
At 350°F, plan for 10-12 minutes total, with a flip halfway through at the 5-6 minute mark. After removing the basket for flipping, check the chips through the window or by lifting a slice with tongs. You want golden coloring with just a hint of browning at the edges. Let the finished batch cool in the basket for 3-5 minutes — they continue crisping as they sit.
- Temperature: 350°F
- Total time: 10-12 minutes
- Flip at: 5-6 minutes
- Cool time before eating: 3-5 minutes
Smaller air fryer models may require smaller batches, which increases total cooking time but ensures each slice gets adequate airflow for consistent crispness.
Are banana chips healthy?
The honest answer depends on how you make them and how you eat them. A plain banana chip made without added sugar or oil sits in a different category entirely from the glossy commercial varieties sitting on gas station shelves, which are often fried in palm oil and dusted with cane sugar.
Nutritional benefits
Dehydrated bananas retain most of the fruit’s fiber and potassium while concentrating the natural sugars. A single medium banana becomes 3-4 chips, making portion control straightforward. The process preserves beneficial compounds like resistant starch (especially in less-ripe bananas) and certain antioxidants, though high heat in the air fryer and oven does reduce some heat-sensitive nutrients.
Banana chips made with added oils or sugars can rival potato chips calorie-for-calorie. Even without those additions, a dehydrator’s low-heat process concentrates sugars, so moderation still applies — they’re a better snack than a candy bar, but not a free pass to eat the whole batch.
Health risks comparison
Commercial banana chips often contain added oils and preservatives that homemade versions avoid. Store-bought varieties may also contain sulfite preservatives used to maintain color, which trigger reactions in some people. By making them at home, you control every ingredient that goes in. The trade-off is caloric density: a handful of banana chips packs the sugar of a whole banana into a few bites, which can catch you off guard if you’re watching sugar intake.
Oil-free options
Both the dehydrator and air fryer methods work without any oil. The dehydrator requires none by design. The air fryer also produces crisp results without oil, though you’ll notice slightly better browning if you add a light spritz of oil or cooking spray. For an oil-free approach, accept that the chips may look a bit paler than commercial versions — they still taste just as good.
thecheaplazyvegan.com, thebellyrulesthemind.net, pickyeaterblog.com, recipethis.com, youtube.com, healthfulblondie.com
Homemade banana chips outperform store-bought greasy versions, just as the homemade banana chips tutorialhighlights with simple staples and versatile appliances.
Frequently asked questions
What bananas work best for chips?
Firm, slightly underripe bananas work better than very ripe ones. Greenish-yellow bananas hold their shape during cooking and yield a more satisfying chip texture. Overly ripe bananas with brown spots tend to fall apart and result in mushy chips rather than crisp ones.
How thin should banana slices be?
Aim for about ¼ inch thickness, or roughly 4mm. Thinner slices crisp faster but burn more easily. Thicker slices take longer and may stay soft in the center. Consistent thickness matters more than the exact measurement — a mandoline slicer helps keep all pieces uniform.
Do banana chips need oil?
No, banana chips don’t need oil. Both the dehydrator and air fryer methods produce crispy results without any added fat. If using an air fryer, a light oil spritz helps with browning and prevents sticking, but it’s optional. Oven-baked chips also work fine without oil.
How to store homemade banana chips?
Cool the chips completely, then store in an airtight container with minimal air inside. For room temperature storage, consume within 3-5 days. For longer storage, use the refrigerator and they’ll keep for about two weeks. A silica gel packet helps preserve crispness in humid climates.
Can green bananas make chips?
Yes, green bananas work well for chip-making and are actually preferred by some cooks. They contain more resistant starch and less sugar than ripe bananas, which can be beneficial if you’re watching blood sugar. The texture tends toward crisp rather than chewy, and some people notice a slightly starchy taste that fades with proper drying.
What if no dehydrator available?
Both the oven and air fryer methods work without any special equipment. The oven takes 1½ to 2 hours at 200°F. The air fryer takes 10-12 minutes at 350°F. Either method produces satisfying results, so you don’t need to buy a dehydrator just to make banana chips at home.
Are sweetened banana chips healthy?
Banana chips with added sugar or coating should be treated more like candy than health food. The drying process concentrates whatever sugars are present, so sweetened chips pack significantly more sugar per bite than you’d expect. For a healthier option, skip the sugar coating and let the banana’s natural sweetness shine through, especially if you use riper bananas.
More related posts
 Yoga Studios Near Me: Top Dublin Picks for Beginners
 Where to Buy Gold Bars in Singapore – Top Dealers, Prices and GST
 What to Do in London – Best Attractions, Free Activities and Itineraries
 My Family Clinic Anchorvale – Location, Hours and Services Guide
 Sheng Siong Supermarket Photos: Singapore Stores & Promotions
 COVID-19 Vaccine Ireland: Types, Boosters & HSE Guide 2025
 Lian Shan Shuang Lin Monastery – History, Architecture, Visitor Guide
 52 Inch to CM – Exact Conversion and TV Guide